
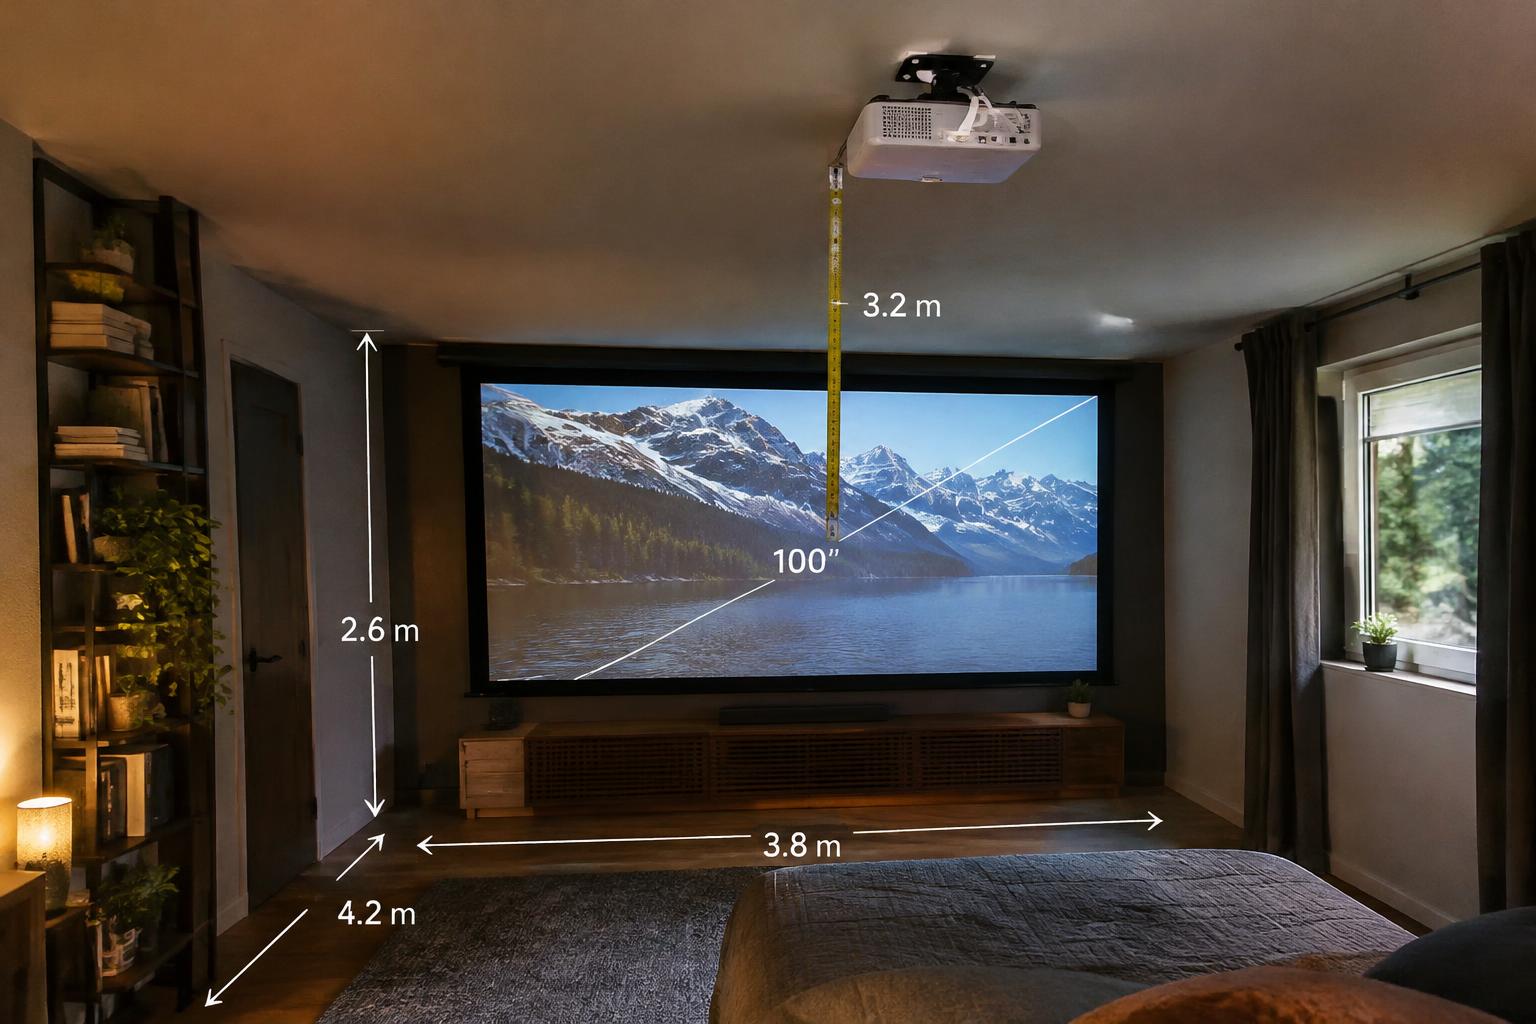
A projector mounted just a few inches too far from the wall can produce an image that overwhelms a small bedroom or looks soft at the edges. Your starting point is the projector’s throw ratio, which relates lens-to-screen distance to image width. Use the manufacturer’s specifications, and see this Home Theater Setup Guide: Stop Guessing Your Throw Distance for setup context.
Key Takeaways:
- Use the projector’s throw ratio to calculate lens-to-screen distance: multiply the desired image width by the ratio, then confirm the result in the manufacturer’s specifications.
- Measure from the projector lens to the screen surface, not from the back of the projector. Account for the lens position, mounting hardware, and available clearance in a small bedroom.
- Set image size and seating distance together. A larger image needs a longer throw distance and enough room for viewers to sit comfortably without straining their eyes.
Understand Projector Throw Distance
Throw distance is the space between the projector’s lens and the screen, while throw ratio describes how that distance relates to the image’s width. A lower ratio produces a wider image from a shorter distance; a higher ratio requires more space for the same width. Treat the ratio as the basis of your calculation, not a measure of image quality: distance equals throw ratio multiplied by image width, using the same units for both measurements.
| Throw ratio | Image width | Calculated distance |
|---|---|---|
| 0.8:1 | 80 inches | 64 inches |
| 1.2:1 | 80 inches | 96 inches |
| 1.5:1 | 80 inches | 120 inches |
Find the projector’s throw ratio
Locate the throw ratio in the projector’s specifications or user manual, usually listed as a single value or a range such as 1.2-1.5:1. The ratio means the lens-to-screen distance divided by the projected image width. For a zoom lens, use the range to calculate the shortest and longest placement distances; a 1.2-1.5:1 ratio with a 80-inch-wide image calls for 96 to 120 inches. Use your exact model’s range, since ratios vary between projectors.
Measure image width, not diagonal
Measure the screen’s visible horizontal span, from the left edge of the projected image to the right, because the throw-ratio formula uses width rather than diagonal size. A screen sold by its diagonal measurement does not provide the needed input directly; for a standard 16:9 image, divide the diagonal by approximately 1.15 to estimate its width. For instance, a 100-inch diagonal corresponds to about 87 inches wide. Keep units consistent throughout the calculation.
Calculate the Correct Projector Distance
Start with the projector’s optical specifications, then calculate the distance from the lens to the screen plane rather than from the back of the projector to the wall. A tape measure gives you the available room depth, while the model’s throw ratio or distance chart identifies which lens positions fit that space. Keep the lens location clear in your measurements, since a ceiling mount or shelf can place it several inches forward of the projector’s rear panel.
Use the throw-ratio formula
Multiply the screen’s image width by the projector’s throw ratio to find the lens-to-screen distance: distance = image width × throw ratio. Use the image width, not the diagonal measurement, and keep the units consistent. For a 100-inch diagonal, 16:9 screen, the image is about 87 inches wide; a projector with a 1.5:1 ratio therefore needs roughly 131 inches from lens to screen. Check whether the listed ratio gives a fixed value or a zoom range.
Check the manufacturer’s distance chart
Manufacturer charts translate a model’s lens specifications into usable distances for common image sizes, reducing errors from rounding or unusual optics. Find the chart for the exact projector model, then locate the image-width or diagonal measurement it uses and read the corresponding lens-to-screen range. Use the correct model chart, since visually similar versions can have different lenses. If the chart lists minimum and maximum distances, treat them as limits for that image size, not as universal room-depth figures.
Allow for zoom-lens adjustments
With a zoom lens, the throw ratio changes across the zoom range, so one image size can correspond to several possible lens positions. Use the distance chart’s near and far values to determine whether your room depth falls within that range, then leave enough mounting adjustment to position the lens accurately. Optical zoom changes framing without moving the projector; digital zoom instead crops or scales the image and can reduce detail. Record the lens-to-screen distance at the intended zoom setting.
- Measure from the lens opening, not the projector chassis.
- Measure to the screen surface, not the wall behind it.
- Use the chart units exactly as printed.
Measure Your Bedroom or Home Theater
Start with the room as it is used, not an empty floor plan. Mark the screen location and the projector’s likely position, then record the clear distance between them, along with the room’s width and ceiling height. A tape measure and masking tape provide a practical layout you can revise before drilling or moving furniture. Include a clear path for the beam and note fixed features such as alcoves, beams, and built-in shelving.
Measure from lens to screen
Use the projector lens as the starting point, rather than the back of the unit or its mounting bracket. Measure straight to the intended screen surface, keeping the tape parallel to the beam path; for a ceiling installation, account for the lens position below the ceiling. Mark both endpoints with painter’s tape and record the usable lens-to-screen distance. A recessed screen or framed display should be measured to its visible projection surface, not the surrounding wall.
Account for furniture, doors, and walkways
Map the room with beds, dressers, seating, and doors in their normal positions, then trace the projector’s proposed line to the screen. A tall wardrobe or pendant light in that path can cast shadows, while a low unit near a doorway risks being bumped. Keep walkways unobstructed, especially beside the bed and at the room entrance. Mark door swings on the floor plan so an open door does not block the beam or access to the projector.
Check ceiling and wall mounting options
Inspect the ceiling joists and wall studs before choosing a mounting point; drywall alone is not a safe anchor for an overhead projector. A stud finder, level, and the mount’s installation template help locate a stable position and keep the lens aligned with the screen. Check for ceiling fans, light fixtures, vents, and access panels near the proposed mount. Secure attachment to framing matters most above a bed or seating area, where a loose mount could cause injury.
| Room feature | What to measure or inspect | Why it matters |
|---|---|---|
| Screen position | Lens to visible screen surface | Establishes the clear projection path |
| Furniture and doors | Beam obstructions and door swings | Prevents shadows and blocked walkways |
| Ceiling or wall | Joists, studs, and nearby fixtures | Identifies a secure, unobstructed mount location |
Choose Screen Size and Seating Distance
Screen width, image height, and the seats’ position define how large the picture feels in a compact room. Map the intended screen area and seating locations before settling on a layout, accounting for doors, windows, and furniture that could interrupt the view. A clear line of sight from each seat keeps heads and room features out of the image, while balanced proportions prevent the screen from dominating a small bedroom or leaving a theater wall underused.
Match screen size to room dimensions
Measure the usable wall width and height, not just the room’s overall dimensions, then allow space for a screen frame and nearby furnishings. A wide image needs sufficient vertical clearance for its chosen aspect ratio, while a narrow wall may call for a smaller diagonal. Keep the screen centered on the primary seating area and avoid placing its edges behind shelves or curtains. Usable wall area sets the practical limit on screen size.
Set a comfortable viewing distance
Place your main seat far enough back that the full image fits comfortably within your field of view, without forcing your eyes to track constantly from side to side. For a wide screen, viewers generally sit farther away than they would from a smaller image; personal comfort and content type also matter. Test the proposed position with a temporary outline on the wall, then confirm that every seat has a clear view of the screen’s edges.
- Mark the screen corners with painter’s tape.
- Keep tall lamps outside the viewing line.
- Check that reclined seats still face the screen.
Fine-Tune the Setup: Tips and Factors
Small rooms often leave little margin for shifting a projector once its bracket is fixed, so account for alignment, access, and the screen’s position before drilling. Treat mounting flexibility as part of the installation, not as a cosmetic correction: digital adjustments can alter image geometry or sharpness, while physical repositioning preserves the projector’s intended optics. A few careful trials with the projector supported temporarily can reveal conflicts with a ceiling fan, door swing, or furniture.
Consider lens shift, keystone, and mounting height
Lens shift moves the image optically without tilting the projector, making it the preferred adjustment when your model includes it. Use lens shift first, then keep keystone correction modest; digital keystone reshapes the picture and can reduce usable detail. Set the mount so the lens sits within the manufacturer’s vertical and horizontal shift range, and aim the chassis squarely at the screen. Check that the image edges align with the screen frame before tightening the bracket.
Leave room for ventilation and cable access
Projector vents need clear space so warm air can escape rather than recirculate around the housing. Follow the clearance specified in the manual, and avoid enclosing the unit in a tight shelf or pushing its rear panel against a wall. Preserve unblocked airflow around intake and exhaust grilles, especially in compact bedrooms where the projector may sit close to a ceiling or cabinet. Leave enough room to reach the power socket, HDMI ports, and focus controls without disturbing the mount.
Test the image before final installation
Before drilling, place the projector on a stable table or temporary support at the planned height and connect the source you expect to use. Display a test pattern or a menu with straight edges, then adjust focus, lens shift, and screen alignment. A temporary image test can expose keystone distortion, blocked ports, or a mount position that conflicts with a ceiling fixture. Mark the lens center and bracket locations only after the picture fills the screen evenly.
| Installation detail | Preferred adjustment | What to verify |
|---|---|---|
| Image position | Lens shift | Edges align with screen frame |
| Image shape | Square projector placement | Keystone correction remains modest |
| Ventilation | Manual-specified clearance | Intake and exhaust grilles stay clear |
| Mount location | Temporary image test | Ports remain reachable and unobstructed |
Conclusion
Accurate projector placement starts with the throw ratio and your intended screen width: multiply the width by the ratio to find the lens-to-screen distance. Measure from the lens, not the back of the projector, and confirm the manufacturer’s range accounts for zoom and lens shift. In a small bedroom, verify that the calculated position leaves room for seating and ceiling fixtures; in a home theater, align the image with the screen before securing a ceiling mount.
FAQ
How do I calculate the correct projector distance for a small bedroom or home theater?
Multiply the desired image width by the projector’s throw ratio to estimate the lens-to-screen distance. If the projector has a zoom lens, its throw ratio may cover a range, so check the manufacturer’s distance chart for the exact model and image size.
How much space do I need to install a projector in a bedroom?
You need enough clear space between the projector lens and the screen for the image size your projector supports. The required distance varies by model and zoom range, and the installation must also leave room for ventilation, cables, furniture, doors, and walkways.
How long does it take to set up a home projector?
A basic projector setup can take an hour or two, while a ceiling mount or complicated cable routing can take longer. The time depends on whether the screen and mounting points are already in place, and final alignment may require several image tests.
What are common mistakes when positioning a projector?
Common mistakes include measuring from the projector body instead of the lens, using screen diagonal instead of image width, and overlooking the model’s throw range. A position that requires excessive keystone correction can also reduce image quality, so aim the projector squarely at the screen where possible.
Is a short-throw projector a good alternative for a small room?
A short-throw projector can produce a large image from a shorter lens-to-screen distance, which may suit a room with limited space. Check its throw ratio and placement requirements, since furniture, screen size, and the available mounting position still determine whether it will fit.